Melee gear: Difference between revisions
No edit summary |
No edit summary |
||
| Line 5: | Line 5: | ||
<div style="text-align:center;"> | <div style="text-align:center;"> | ||
[[File:Quest_tab.png|frameless|243x243px]] | [[File:Quest_tab.png|frameless|243x243px]] [[File:Upgrade_dashboard.png|frameless|414x414px]] | ||
</div> | </div> | ||
=== | == <span style="color:#00bcd4">🛡️ Armour Progression</span> == | ||
'''Void Knight''' | === Void Knight Series === | ||
{| class="wikitable" style="background:#1e1e1e; color:white; width:100%; border:2px solid #00bcd4;" | |||
|+ '''Void Knight Armour''' | |||
|- | |||
| [[File:Void_knight..png|frameless|120px]] | |||
| '''Void Knight''' | |||
Skill Requirements: 42 [[Attack]], [[Strength]], [[Defence]], [[Magic]], [[Range]] | Skill Requirements: 42 [[Attack]], [[Strength]], [[Defence]], [[Magic]], [[Range]] | ||
10% | 🟢 10% Melee Damage & Accuracy Boost | ||
|- | |||
| [[File:Void knight(or).png|frameless|120px]] | |||
| '''Void Knight (or)''' | |||
🟢 15% Melee Damage & Accuracy Boost | |||
Same skill requirements | |||
|- | |||
| [[File:Elite_void_knight_or.png|frameless|120px]] | |||
| '''Elite Void Knight (or)''' | |||
🟢 20% Melee Damage & Accuracy Boost | |||
Same skill requirements | |||
|} | |||
=== Bandos Series === | |||
{| class="wikitable" style="background:#1e1e1e; color:white; width:100%; border:2px solid #00bcd4;" | |||
''' | |+ '''Bandos Armour''' | ||
|- | |||
| [[File:Bandos (or).png|frameless|120px]] | |||
[[File: | | '''Bandos''' | ||
'''Bandos''' | |||
Skill Requirements: 65 [[Defence]] | Skill Requirements: 65 [[Defence]] | ||
[[File: | |- | ||
| [[File:Bandososr.png|frameless|120px]] | |||
| '''Bandos (or)''' | |||
'''Bandos (or)''' | |||
Skill Requirements: 85 [[Defence]] | Skill Requirements: 85 [[Defence]] | ||
|} | |||
''' | === Torva Line === | ||
{| class="wikitable" style="background:#1e1e1e; color:white; width:100%; border:2px solid #00bcd4;" | |||
|+ '''Advanced Melee Sets''' | |||
[[File: | |- | ||
| [[File:Torva.png|frameless|120px]] | |||
'''Torva''' | | '''Torva''' | ||
Skill Requirements: 80 [[Defence]] | Skill Requirements: 80 [[Defence]] | ||
🟢 +30% Melee Damage Boost | |||
[[File: | |- | ||
| [[File:Dragon guard.png|frameless|120px]] | |||
'''Dragon Guard''' | | '''Dragon Guard''' | ||
Skill Requirements: 85 [[Defence]] | Skill Requirements: 85 [[Defence]] | ||
🟢 +50% Melee Damage Boost | |||
[[File: | |- | ||
| [[File:Sang torva.png|frameless|120px]] | |||
'''Sanguine Torva''' | | '''Sanguine Torva''' | ||
Skill Requirements: 80 [[Defence]] | Skill Requirements: 80 [[Defence]] | ||
🟢 +80% Melee Damage Boost | |||
|} | |||
''' | == <span style="color:#00bcd4">🛡️ Shields</span> == | ||
[[File: | {| class="wikitable" style="background:#1e1e1e; color:white; width:100%; border:2px solid #00bcd4;" | ||
|+ '''Shield Options''' | |||
|- | |||
| [[File:Dfs.png|frameless|120px]] | |||
| '''Dragonfire Shield''' | |||
|- | |||
| [[File:Dragon defender.png|frameless|120px]] | |||
| '''Dragon Defender''' | |||
|- | |||
| [[File:Avernic def.png|frameless|120px]] | |||
| '''Avernic Defender''' | |||
|- | |||
| [[File:Ghommals avernic def 5.png|frameless|120px]] | |||
| '''Ghommal's Avernic Defender 5''' | |||
🔹 Requires 6x Dragon Defenders + 6x Avernic Hilts | |||
Talk to Alec Kincade at '''::skill''' | |||
|- | |||
| [[File:Ghoms 6.png|frameless|120px]] | |||
| '''Ghommal's Avernic Defender 6''' | |||
🔹 Upgrade from Ghommal’s 5 using: | |||
16x Dragon Defenders + 16x Avernic Hilts | |||
|} | |||
== <span style="color:#00bcd4">⚔️ Weapons</span> == | |||
''' | === <span style="color:#ff9800">Single-Handed</span> === | ||
[[File: | {| class="wikitable" style="background:#1e1e1e; color:white; width:100%; border:2px solid #ff9800;" | ||
|+ '''Single-Handed Melee Weapons''' | |||
|- | |||
| [[File:D scim.png|frameless|120px]] | |||
| '''Dragon Scimitar''' | |||
|- | |||
| [[File:D scim or.png|frameless|120px]] | |||
| '''Dragon Scimitar (or)''' | |||
|- | |||
| [[File:Whip.png|frameless|120px]] | |||
| '''Abyssal Whip''' | |||
|- | |||
| [[File:Whip or.png|frameless|120px]] | |||
| '''Abyssal Whip (or)''' | |||
|- | |||
| [[File:Frozen whip.png|frameless|120px]] | |||
| '''Frozen Abyssal Whip''' | |||
|- | |||
| [[File:Aby tent or.png|frameless|120px]] | |||
| '''Abyssal Tentacle (or)''' | |||
|- | |||
| [[File:Grhazi rapier.png|frameless|120px]] | |||
| '''Ghrazi Rapier''' | |||
|- | |||
| [[File:Holy ghrazi rapier.png|frameless|120px]] | |||
| '''Holy Ghrazi Rapier''' | |||
|- | |||
| [[File:Osmumtens fang.png|frameless|120px]] | |||
| '''Osmumten's Fang''' | |||
|- | |||
| [[File:Osmumtens fang or.png|frameless|120px]] | |||
| '''Osmumten's Fang (or)''' | |||
|- | |||
| [[File:Demon x spear.png|frameless|120px]] | |||
| '''Demon X Spear''' | |||
🔸 *Keris Partisan of Corruption + 500m MadPoints + 25 Eye of Corruptors* | |||
|- | |||
| [[File:Demon x sword.png|frameless|120px]] | |||
| '''Demon X Sword''' | |||
🔸 *Osmumten's Fang (or) + 500m MadPoints + 15 Eye of Corruptors* | |||
|- | |||
| [[File:Demon x scythe.png|frameless|120px]] | |||
| '''Demon X Scythe''' | |||
🩸 *Multi-target, heals on hit* | |||
🔸 *Blood Scythe + 500m MadPoints + 25 Eye of Corruptors* | |||
|} | |||
''' | === <span style="color:#e91e63">Two-Handed</span> === | ||
[[File:Blood scythe.png | {| class="wikitable" style="background:#1e1e1e; color:white; width:100%; border:2px solid #e91e63;" | ||
|+ '''Two-Handed Melee Weapons''' | |||
|- | |||
| [[File:Axe of Araphel.png|frameless|120px]] | |||
| '''Axe of Araphel''' | |||
⚡ *Single-target, very fast* | |||
|- | |||
| [[File:Scythe.png|frameless|120px]] | |||
| '''Scythe of Vitur''' | |||
🔱 *Multi-target* | |||
|- | |||
| [[File:Holy scythe.png|frameless|120px]] | |||
| '''Holy Scythe of Vitur''' | |||
🔱 *Multi-target* | |||
|- | |||
| [[File:Sang scythe.png|frameless|120px]] | |||
| '''Sanguine Scythe of Vitur''' | |||
🔱 *Multi-target* | |||
|- | |||
| [[File:Blood scythe.png|frameless|120px]] | |||
| '''Blood Scythe''' | |||
🔱 *Multi-target* | |||
🩸 *Heals on hit* | |||
|} | |||
Revision as of 03:48, 24 May 2025
Melee Gear Guide
This guide outlines the typical progression path of melee gear rather than a full armor list.
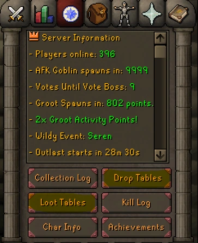
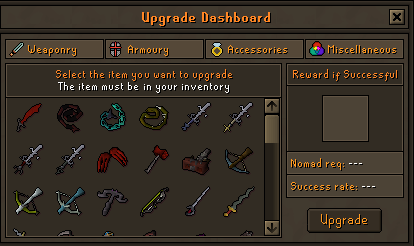
All item sources can be found (unless stated otherwise) by checking the drop tables or loot tables from the quest tab, or via the upgrade dashboard interface at the strange machine at ::home. Equipment upgrade paths are also available on the Item or Equipment Upgrades page.
🛡️ Armour Progression
Void Knight Series

|
Void Knight
Skill Requirements: 42 Attack, Strength, Defence, Magic, Range 🟢 10% Melee Damage & Accuracy Boost |

|
Void Knight (or)
🟢 15% Melee Damage & Accuracy Boost Same skill requirements |

|
Elite Void Knight (or)
🟢 20% Melee Damage & Accuracy Boost Same skill requirements |
Bandos Series

|
Bandos
Skill Requirements: 65 Defence |

|
Bandos (or)
Skill Requirements: 85 Defence |
Torva Line

|
Torva
Skill Requirements: 80 Defence 🟢 +30% Melee Damage Boost |

|
Dragon Guard
Skill Requirements: 85 Defence 🟢 +50% Melee Damage Boost |

|
Sanguine Torva
Skill Requirements: 80 Defence 🟢 +80% Melee Damage Boost |
🛡️ Shields


